Learn how to measure and read the vernier calliper easily in this guide and start to ace your exams.
Taking measurements and reading them correctly are two different aspects of Physics. Apart from the key role measurement plays in Physics, measurement also holds a vital position in any professional field of study you can think of. Be it Mathematics, Chemistry, Accounting, Biology, or even English.
Yet, the accuracy of a measured value is always a step behind its ubiquity. In other words, no measurement is 100% accurate, even though there is barely a day that people will not carry out measurements. To curtail making excessive mistakes, scientists develop different measuring devices for divergent needs.
As a result of this, you can now easily check your body weight on a weighing scale, measure a line with a ruler, or even measure the thickness of a piece of paper. No matter how tiny the object to be measured might appear, you will always find something to carry out your measurement.
One of the measuring instruments you will find in handy as a scientist especially a fusion scientist (physicist) is the vernier calliper. However, using this tool for measurement has seemed to be really difficult for many lads who find themselves operating one. Even when they carry out the measurement successfully, recording the values poses another challenge.
Regardless of the category you fall into, you are going to surely be drawn out of your oblivion as you are going to learn exactly how you can take measurements with the vernier calliper and also read your values accurately. But before we proceed into this, let’s have a breakdown of what a vernier calliper is and identify the parts of a vernier calliper.
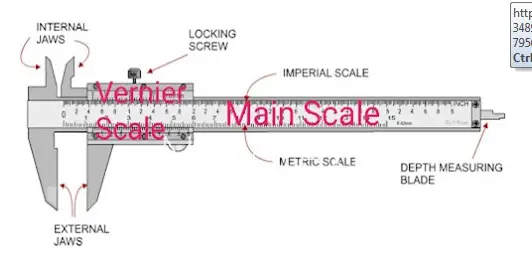
What Is A Vernier Calliper?
Vernier callipers are a set of measuring instruments used to take measurements (which cannot be measured using a meter rule) to an accuracy of 0.01 cm or 0.1 mm. The name “Vernier” was derived from the second name of the French Scientist Pierre Vernier, who invented the instrument in 1631.
Vernier calliper has two scales otherwise known as a set of jaws; the main scale which is usually denoted with a capital “M” and the vernier scale which is usually represented by a capital “V”.
The bigger scale or the main scale is graduated in millimetres and sometimes, in centimetres while the smaller scale or the vernier scale serves as an addition to the main scale and slides on it to give the fraction of the most minor division on the main scale.
The vernier callipers, therefore, can be calibrated in either centimetres or millimetres; this is derived by dividing nine (9) of the 0.1cm on the main scale into ten (10) equal intervals making each vernier interval to be 0.9mm or 0.09cm. Hence, there exists a difference of 0.1mm or 0.01cm between the main scale and the vernier scale which slides on it.
What Can A Vernier Calliper Measure?
As stated earlier, vernier callipers can be used to measure the length of objects to the nearest 0.1 mm or 0.01 cm. The following are examples of such objects:
- The thickness of a metre rule
- Diameter of a rod or tube
- The thickness of a plate or sheet
- Depth of a cavity
It should be noted that the vernier calliper can also measure smaller objects but will not give a reliable result, therefore, you should make use of a micrometre screw gauge in such cases. For instance, if you are asked to measure the density of a piece of paper.
How To Read The Vernier Calliper
Once you have correctly placed the object to be measured in the right place, the next thing is to read your result. This is where many individuals especially students seem lost though reading the vernier calliper is not challenging as it looks.
To read the vernier calliper, what you require is the total values on both the main scale and the vernier scale. That should be quite easy, right? Let’s find out how easy it is.
You May Also Like: How To Start A Blog And Make Money In School (2023)
Don’t be scared, it is easy
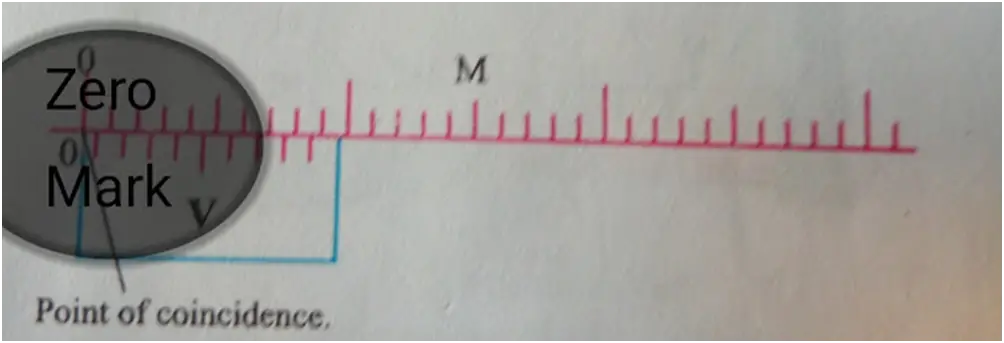
The first thing you need to observe is the zero mark of the main scale (M) and the vernier scale (V). At the point of coincidence, the length of the object is zero. As you slide the vernier scale to grip the object tighter then the readings will be altered and once you have held the object well, you can proceed to the next step.
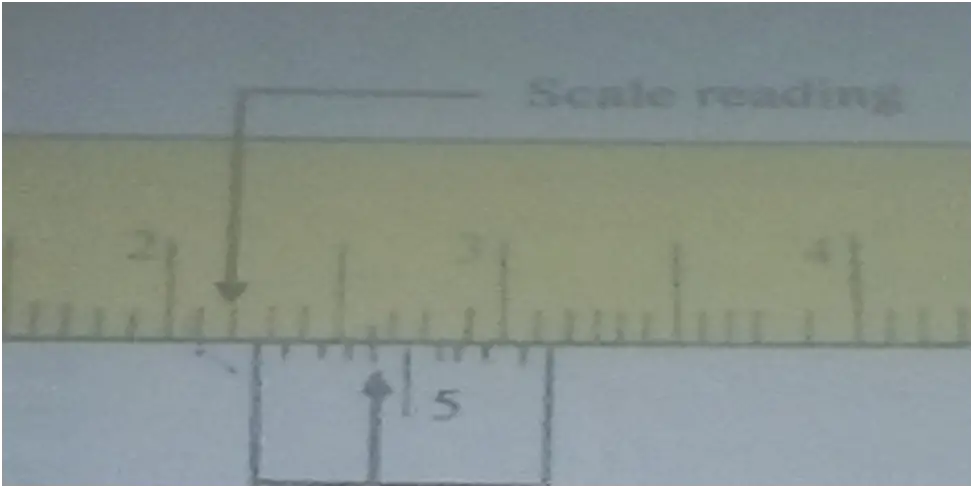
The main scale value will be denoted by the point (line of the interval) on the main scale before the zero mark of the vernier scale, that is, the value of the cm you record before getting to the lines of the smaller scale (vernier scale).
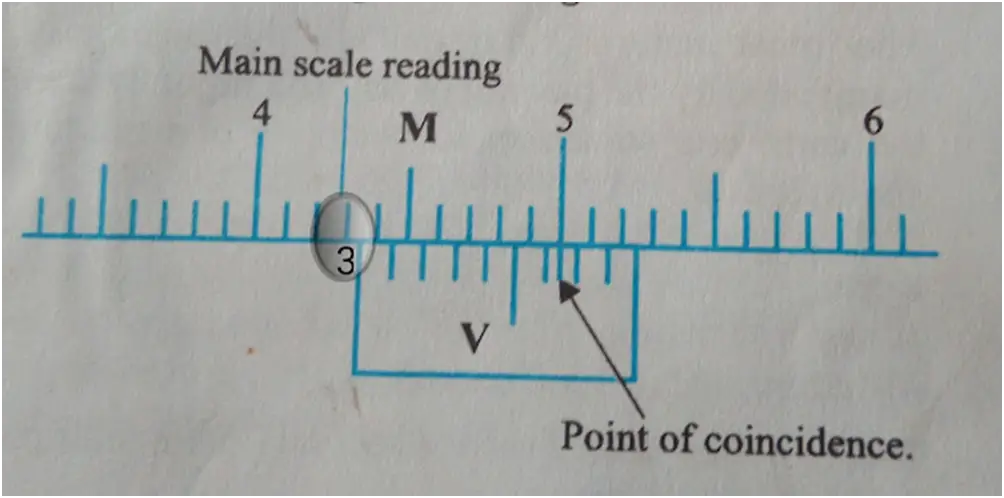
As you can see from the picture, the value of the main scale recorded will be 4.3cm.
To get the value of the reading on the vernier scale, you need to find the point of intersection of the main scale and the vernier scale. The value at this point denoted the reading of the vernier scale.
From the picture, the reading on the vernier scale will be 0.07cm.
To get the final measurement, add the value on the main scale to that on the vernier scale. Using the values from the illustrated figure; the total value of the vernier calliper reading will be 4.3cm+0.07cm = 4.37cm
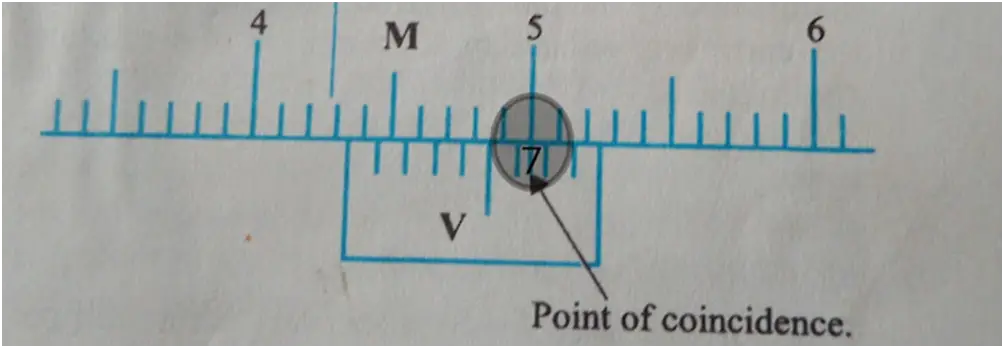
Example 2:
As shown in the picture above, the 2.2cm mark is the last interval on the main scale before the zero mark on the vernier scale while 0.04 cm is the mark that coincides with the interval of the main scale. As a result, the total measurement is 2.2 cm plus 0.04 cm, or 2.24 cm or 22.4 mm.
Precautions To Observed While Using The Vernier Calliper
While taking measurements, you need to be extremely careful, as a little mistake might jeopardize your efforts and leave you with an inaccurate result. The following precautions should be taken while using the vernier calliper:
- Watch out for Zero errors: Zero errors are recorded when you take a measurement on the vernier calliper without ensuring that the zero mark of the main scale and vernier scale coincides, therefore leading to an addition or a reduction in the final results.
To avoid this, ensure that the zero mark on the main scale and that of the vernier scale are in line. If you observe you have committed such an error, just add or subtract the difference based on the position of the measured object when the error was committed.
- Beware of Parallax errors: This is when you observe the mark from a wrong position, therefore, leading to an apparent shift in the position of the intervals. This error causes you to record an apparent result instead of a real result.
To avoid this error, ensure you are observing the vernier calliper from a correct position usually from the front as side-way observation can lead to parallax errors.
- Ensure that the object to be measured is tightly gripped before taking measurement.
And that is it
You should be able to carry out your measurement with a vernier calliper in no time if you follow the above instructions keenly. In case you become lost, which appears to be impossible, endeavour to quickly go over the steps, and your mistakes will be exposed within seconds.
Measurement is something we really cannot do without, and at any time, you can be charged with the responsibility of using a vernier calliper to take measurements. Just collect the instrument, follow the above instructions, and that is all.
If there are any other instruments you would like us to discuss their usage and readings, you may let us know in the comment section.
Before you go, enjoy this lovely poem from me to you: Poem On Hope: A Better Day